Canvas Scheduler is part of the calendar and creates appointment groups (collection of individual appointments) that students can sign up for.
You may use it to:
- create office hours
- schedule TA sessions
- assign presentation times and host other appointments
Recommend: Easily host Zoom office hours within your Canvas course site.
Creating a sign-up schedule
Step 1.
- Click on "Calendar" at the left of the global navigation menu.
- Navigate to the "+" button to create a new event.

Step 2.
- You'll see a pop-up window. Click on the "Appointment Group" tab.

Step 3.
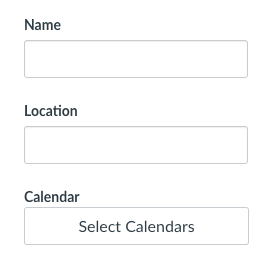
- Provide a title and location.
Note: If using this for Office Hours: We recommend setting up your office hours from your Zoom tab on your Canvas course site to keep everything easy to find in place for students. When creating your office hours link in Zoom, remember to set the "Waiting Room" option so you control when students join just as you would have your office door closed when working with one student and having the other student wait outside your office.

Step 4.
- Click on "Select Calendars" to get the drop-down menu for the course you wish to apply the appointment.

Step 5.
- Click "Done".
- Confirm the course calendar. Otherwise, students will not be able to sign up for an appointment if it is in the wrong calendar.


Step 6.
- Set the date and time.
- If you wish Canvas to evenly divide the block of time for you, enter the desired length of time per appointment and then select "Go".
- It will then populate the time slots.
- If you wish Canvas to evenly divide the block of time for you, enter the desired length of time per appointment and then select "Go".


Step 7.
- Click and select "Limit each slot to # users" and "Limit participants to attend 1 appointment".
These selections prevent a student from taking more time than allotted.
For example, if you did not limit each time slot to 1, then 2 students could sign up for that 30-minute block.
If you did limit participant attendance then a student could sign up for all of the 30-minute blocks for that day.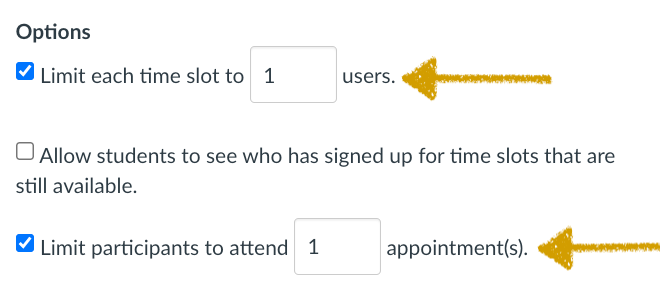

Step 8.
- Click the "Publish" button. It will go live and students can start to sign-up immediately. You will see the appointment blocks populate in the calendar.

You may ONLY edit the appointment information for the: name, location, options, and details.
You may NOT change the date, time, or division of the time slots. If you need to make these changes, you will need to delete and recreate the appointment.
Get notified when students sign-up or cancel an appointment
Step 9.
- Click on your Account settings in the upper left corner of your screen and then select Notifications.
- Scroll down to the "Scheduling" and change it to the way you get notified. Hover over an icon to change notification frequency.
- Notifications will appear in your email. The sender is “ notifications@instructure.com” pre-fixed with the name of the student who signed up. The notification email will include the time the student signed up for and the remaining available appointments.


Checking appointment sign-ups in the Calendar
Step 10.
- Click on "Calendar" at the left of the global navigation menu.
- Click on "Agenda" to view who has signed up.

Delete an appointment sign-ups in the Calendar
Step 11.
- Click on "Calendar" at the left of the global navigation menu.
- From the calendar, locate and click the appointment booking and click on the "Delete" button.

Note: you may NOT change the date, time, or division of the time slots. If you need to make these changes, you will need to delete and recreate the appointment.
Instructor support
Email: dce_instructionaltechnology@fas.harvard.edu
Web: teach.dce.harvard.edu/itg
Emergencies: call the help desk at (617) 998-8571
Student support
Support for students is provided by Academic Technology
Email: AcademicTechnology@dce.Harvard.edu
Phone: (617) 998-8571
Resources: Canvas Student Support Guides & Tips