Easily, privately and securely correspond with your students with Canvas Inbox.
* Note: You and your students should make sure Canvas notification preferences are set properly to receive a copy of the email to your personal email addresses.
Step 1.
- In Global Navigation, click the Inbox link.
- The Inbox link includes a numbered indicator that shows how many unread messages you have.
- The Inbox link includes a numbered indicator that shows how many unread messages you have.
Tips:
- Right-click on the Inbox link to open it in a new browser tab while you are doing other tasks in Canvas.
- To reduce the chance of compatibility issues, make sure you send and reply to Canvas messages within Canvas itself rather than your own email service.
Step 2.
- View Toolbar

- To load conversations, filter your messages by course or group and type.

- Compose a message using the compose icon in the middle of the toolbar.

- Search for conversations by user in the right-hand entry field.

- To load conversations, filter your messages by course or group and type.


Note: Once you have selected a conversation, you can use the other options in the toolbar to:
- Reply to a conversation

- Reply-all to a conversation

- Archive a conversation
- Delete a conversation

- Forward, mark a conversation as read or unread, and star conversations


Step 3.
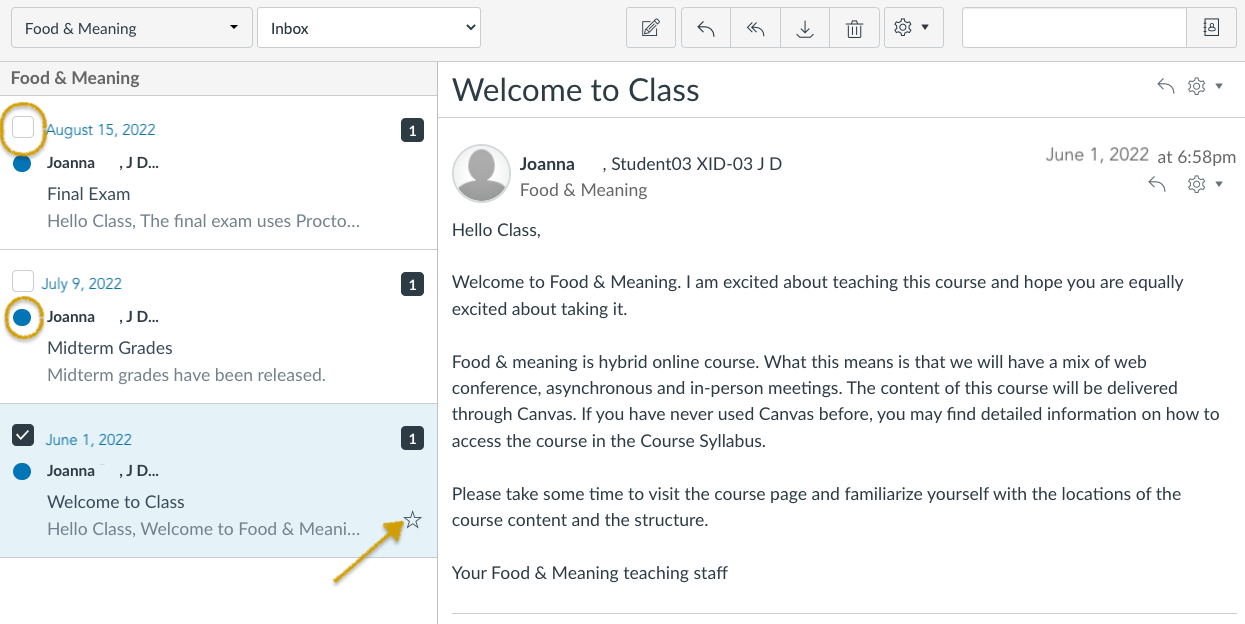
- View Inbox Panels
- Conversations for your selected course and Inbox filter appear in the left Inbox panel.
- The Inbox is split into two panels and displays messages chronologically.
- When you select a conversation, all messages in the thread appear in the right Inbox panel.
- Manually mark a conversation as read or unread by clicking the circle to the left of the conversation. To star a conversation, click the star to the right of the conversation.
Step 4.
- Select Multiple Conversations
- Click the check box for each message. In the Inbox toolbar, click the desired action you wish to perform.
- To select all messages, click the command and A keys (Mac) or the control and A keys (Windows).
- To select a range of messages, click the first message you want to select, hold down the Shift key, and then click the last message you want to select. All messages between the first and the last messages will be selected.

Note:
- Currently you cannot message users in multiple groups.
- Users display in the Inbox once they have an active enrollment in the course, and users cannot join a course unless it is published.
- Once a course has concluded, you can no longer message students in that course.
Step 1.
- Click the Compose icon in the Inbox and select a course from the drop down menu.
- Click the Address Book icon to view a list of user groups in the course.
- You can select individual students or all in a selected group, as well as the entire course.
- If you do not want users to see who else was included in the message, click the "Send an individual message to each recipient" checkbox. If your message includes over 100 recipients (including you as the sender), this checkbox will be selected by default.


Step 2.
- Once finished, click the "send" button in the bottom right corner. Your message will appear at the top of your "sent" folder.
Step 1.
- In the composition window, click the "attachment" icon at the bottom left.

- A pop-up window will appear, allowing you to search your computer for your desired file.
- Select the file and click the "open" button. The file will appear below your composed message.


Step 2.
- You also have the option to attach multiple files by clicking the "attachment" icon again. To delete a file, click the "delete" icon on the top right of the thumbnail.
Instructor support
Email: dce_instructionaltechnology@fas.harvard.edu
Web: teach.dce.harvard.edu/itg
Emergencies: call the help desk at (617) 998-8571
Student support
Support for students is provided by Academic Technology
Email: AcademicTechnology@dce.Harvard.edu
Phone: (617) 998-8571
Resources: Canvas Student Support Guides & Tips